Angie & Alex's Pallet Coffee Table


Bill and I finally finished the coffee table that has been on the back burner for awhile. One driving force to finish it was our trip to see Angie and Alex a few weeks before Christmas. We wanted to get it done and give it to them as part of their Christmas gift.
The top is half of a pallet, we added some ply board under the pallet so they would have a small shelf. Perfect size for TV remotes or game controllers.


I had it all stained and one coat of poly on it, I wasn't sure how to put it together. 
Enter my wonderful husband who decided how to finish it and it turned out better than I had dreamed. He put several coats of poly on it. Then he put the chunky legs with castors on it. 
And the coffee table was born.


The table is kind of heavy so just thought it would be nice to be able to roll it out of the way to clean or whatever.


The shelf is about 5-6 inches wide. Plenty of room for game controllers, TV remotes or maybe just maybe a few Craft Supplies!


I am so pleased with how it turned out. And it was fitting that it went to Angie(the other half of Crafty Saturday) I have the other half of the pallet so you know what I am gonna do with it!
Oh Crafty Saturday How I Love Thee!

Pallet Shelf Finished!


Well this has been a craft project that has taken a long time, not because it should but just because we have been working on a lot of different things.
I am really happy with how it turned out and I think Alex and Angie like it to. 
Angie added her touch of class to it with the knobs on the front.
The coat hooks are old ones from our house that has been in the family since it was built over 100 years ago.


I had Bill cut up my pallet, I have enough of these shelves from one pallet to make at least 2 more. I also have a shelf that is twice as long as this one. 
I sanded it for quite awhile, painted it with blue paint, not a complete covering though.
I sanded it again, to give it a distressed look.
Gave it a few coats of poly and then added the coat hooks on the side.
Then it was up to Angie to put on the finishing touches.
they have it hanging right inside their front door. It looks adorable.

And here you have it, all finished up and hanging!

Oh Crafty Saturday how I love thee!


Christmas Cork Ornaments


Hey everyone! I know this is a little early to be posting Christmas crafts but I guess it's always good to get a  jump start on the Holidays!!

What you will need:
  • Corks
  • Sharpie Markers (red, green, and yellow)
  • Ribbon 
  • Hot glue gun


When I put mine together I used 13 corks. I did a row of one, two, three, four and three. I used the hot glue to attach them together and to give the ornament some extra flair I put a ribbon on the outer edge. I then took a sharpie marker to color a few of the cork ends. To top off my Christmas Cork Ornament I cut a cork in half and glued it to the bottom to make it look like the tree trunk. 


There you have it!

Cute and easy Christmas ornaments, great for gifts or your own tree!


NOT JUST AN ORDINARY BOTTLE ANYMORE!


I absolutely love the look of these bottles!

These are just different whiskey bottles and other various alcohol bottles that I painted and distressed to make them look old and worn. 


The colors I chose look like a milk paint. After I painted them and let them dry over night ( I put 2 coats of paint on them) I took sand paper and scratched some of the paint off in various places to give them a more aged look.
I sealed them with a coat of modpodge. 


I haven't decided if I am going to embellish them with rafia or material flowers on the front or I might just leave them as is. 

I could really see them decorating tables for a wedding or sitting a top an old buffet or dresser, Oh the possibilities are endless!


 I just really love how they turned out. I think I am going to hit up my friends for their old discarded booze bottles!

Oh CraftySaturday how I love thee!!

We ARE Crafty Girls!


Angie posted this to me and I fell in love with it. This has kinda become our motto. When I come home from my real job (someday hopefully this will be my real job ) I can't just sit and watch TV, I have to be making or doing something crafty wise. Hence the little saying above.


Ok, so Angie and I have taken a big step in our crafting!
We have decided to sell some of what we make on ETSY.
We had such a great time at the Applefest we decided to take it to another level.
So far we are just getting our feet wet and we like the feel.

If you are surfing around please check us out and tell us what you think. 
We would love to have some feedback, tips, tricks, and suggestions.

Below is the picture of us when we got started. Love this picture, we had so much fun.
We always make time to craft when we are together 
and maybe have a glass or two of wine and a few beers.

Oh Crafty Saturday how I love thee!!

Woodbine Applefest!! Success!!!


Well Angie and I had a great time at the Woodbine Applefest. It was our first craft show and we did quite well. We only had one mishap. A strong wind came up and shook our tent so hard that 2 of my wine bottle wind chimes came crashing down to the ground. Thank gosh no one was standing under them. And Angies wreaths tipped over. Got things put back together, picked up the pieces of my wind chimes and carried on.

The best thing about the craft show was that Angie got to come home and spend a few days with us. The only one missing was Victoria who is going to school in Arkansas, but we got to talk to her on the phone.

We got to show off and sell quite a few things we have been working on on Crafty Saturday. With this experience behind us I know we will be doing more of these shows. We don't get to see each other very often so this is one way to get together.


We had a great time with many more to come I am sure of that!
My husband, Angie's dad, was instrumental in getting us set up and all tore down at the end of the day. Don't know what we would have done without him. Love that guy! Actually I think he enjoyed himself because he got to spend time with two of his favorite gals, maybe next time all three of his favorite gals will be there! Love you Victoria and really missed you! 
A great big thank you goes out to Debbie Harris and Melissa Frazier for letting us use their tent, Oh and I can't forget to mention Dennis and Brandon. Thanks guys!
Oh Crafty Saturday how I love thee!!!

WOODBINE APPLEFEST


Well Angie and I are getting ready for the Woodbine Applefest. Being held on Saturday Sept. 27. We are taking the crafts we have been working on over the last several months to the flea market. Please come and see us if you make it to Woodbine, it should be a lot of fun.
                  Above and below are some of our crafts we will have available.

I will add a few more pics in the next few days. What is going to be real special is Angie getting to come home. You see the crafts bring us together not only every Saturday when we do them and talk on the phone a dozen times or more, but us being in the same place is going to be great. So even if you don't need anything come see us we would love to visit. I know Angie would because she doesn't get to come home often.
                                     See ya at the Woodbine Applefest!
                                   Oh Crafty Saturday how I love thee!

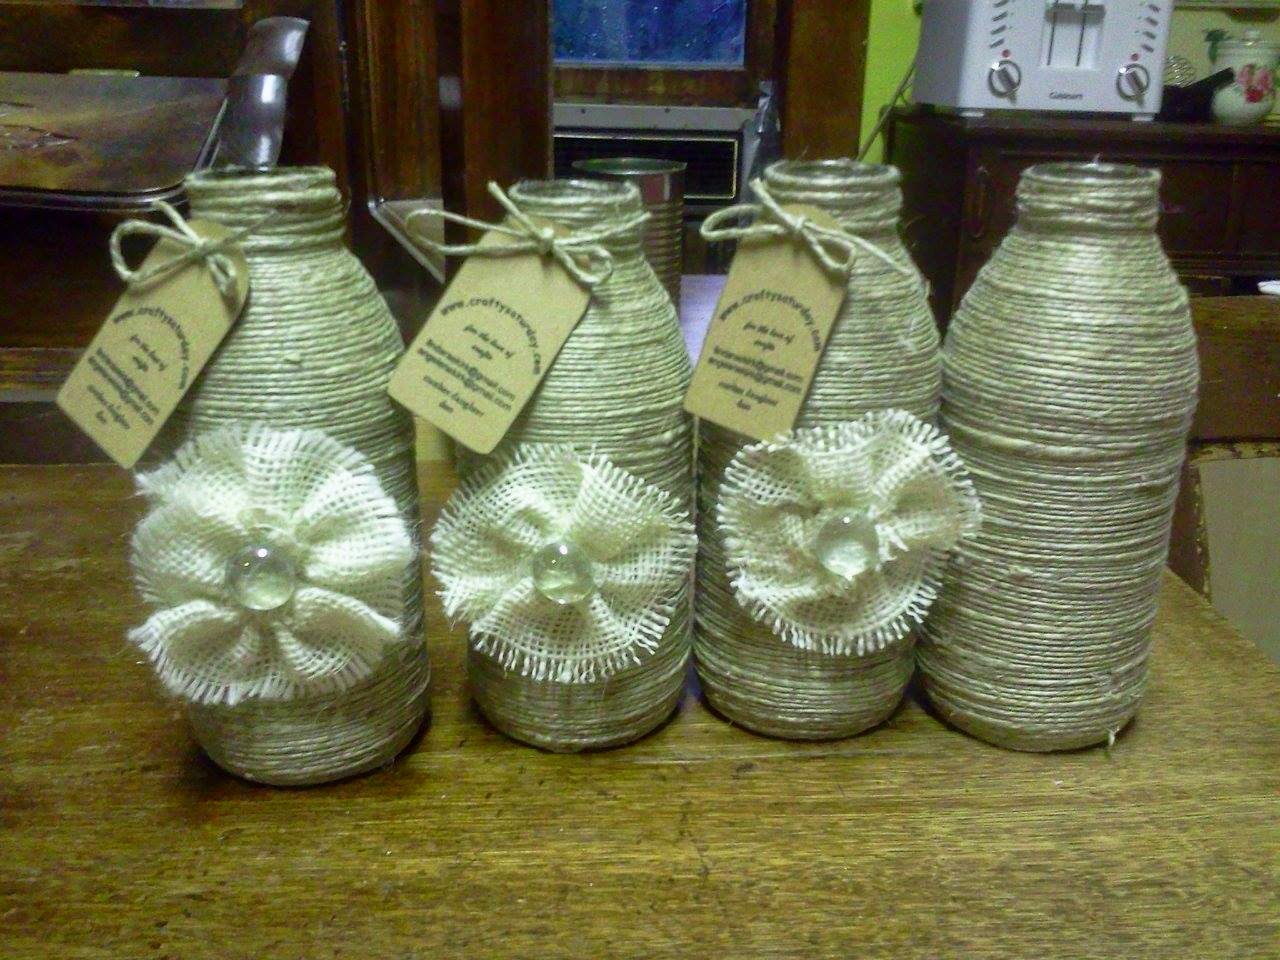
Jute Wrapped Bottles and Cans


I have been working on these for a few Saturday's now. They were fun and easy to do. What a great way to reuse those used cans and bottles you have laying around. I started by hot gluing the jute to the bottle to get it started. Then I used elmers glue and coated the bottle a bit at a time and just started wrapping the jute around and around the bottle. It takes quite a little jute per bottle but I think totally worth it.
Use them as vases, makeup brush holder, pencil holder. Just to name a few.


These little jute flowers are a no sew flower.
Cut a strip of burlap about 2.5" wide and 12-14" long.
Hot glue one of the short ends over itself, as if you are making a hem.
At the other short end grab one of the strings and pull, this will start to gather the piece together.
When you have it gathered pretty tight it will naturally make the shape of a flower. Hot glue the ends.
I put a little gem in the middle to finish it.


My little coffee filter flowers are made by cutting a dyed coffee filter like I did in the photo below.
Then I started folding the strip accordian style and made a flower shape. I finished them off with some buttons I had from my mother. 


All in all I am quite happy with how they all turned out.
Oh and the little tags hanging on them are for when Angie and I go to the Woodbine Applefest. We are getting pretty excited for that. the Applefest is held on the last Saturday in Sept. Should be a lot of fun.
 We decided with all the Crafty Saturday projects we have been doing why not take them on the road. So if you like what we are doing come visit us at the Applefest and if you like, purchase something or just come say HI!
Oh Crafty Saturday how I love thee!!

The Rose


Can you believe it! These roses were made from plastic spoons! 
Yep that's right plastic spoons.

I made the one on the right a couple weeks ago and Victoria and I made the other two today.
Since Angie was off visiting friends I got my other daughter to join in Crafty Saturday.
She is quite talented as you can see by the red one she made. We used white spoons for hers and then spray painted it red and left a little white.

materials needed are:
plastic spoons ( we used 12 for each rose)
tea light 
a wood skewer ( for the stem)
felt for the leaves
hot glue gun


  1. First paint the wood skewer green
  2. Next light your tea light
  3. Take a spoon and holding it upside down over the fire, let the plastic get hot so you can mold the bud. Be careful not to get burned due to the plastic getting hot.
  4. Heat the spoon at the point where it curves and then snip with some snips. You have just made your first petal.
  5. With the remaining spoons hold the spoon upright and heat it until you can bend the end of the spoon back slightly. you can also squeeze the spoon a little to make it slightly more curved. 
  6. Snip these petals like you did on the first one.
  7. Ready to assemble the rose now.
  8. Attach the rose bud to the wood skewer with a dab of hot glue and hold in place til it hardens. (be careful not to get burned by the glue) 
  9. Now start gluing the rest of the petals until you have the desired size rose.
  10. With your green felt make some leaves to attach at the bottom of the rose. (This helps hide the glue and also puts the finishing touch on your rose.)


And there you have it! They are truly a beautiful site. They really look real. And no two are going to be the same, just as in nature.
I am so glad Victoria did Crafty Saturday with me it was a lot of fun. She will be heading back to college in a week so it was great to spend the day with her. She also did some really great paintings on a few bottles which we will be posting in a few days so stay tuned.
And we also made some neat can lid magnets to. We really had a productive Crafty Saturday!

THANKS VICTORIA!


Ceramic Planter turned Lighthouse!

Ceramic Planter Lighthouse 


This summer has been a crazy busy one! I have made time to make crafts of course just no time to put them up on the blog! So here we go, I created this light house out of ceramic planters, paint, and a yard light.

One hot summer Saturday I stated the creation. 

The design is fairly simple, as you can see it is just ceramic planters turned upside down and stacked on top of each other. 

Unlike most of the crafts I do it was expensive... I recommend buying ceramic planters at the end of flower season to get them on sale! I think I spent $30.00 on all of the supplies. The money was well spent though because it was a gift for my grandparents! :) 

HAPPY CRAFTING!

WINE BOTTLE CITRONELLA BURNER


Ok, so it has been awhile since I've added anything. But I think the wait was worth it. Just in time for summertime.

You will need a wine bottle, I used the one with a screw lid.

I made an X in the lid with an exacto knife and and cut the X. Now bend  the 4 little pieces out.

For the wick I used cotton gauze, take 3 pieces and braid them. I made mine about 6 inches long.

Fill the bottle at least 1/2 way with water and fill the balance with citronella oil, since the wick is only 6 inches long no need to fill  it only with citronella.

There you have it, a simple and cute way to rid yourselvesof those pesky mosquitos.

If you want you can do what I did to dress them up a bit.

I made burlap flowers and hotglued them.

OH CRAFTY SATURDAY HOW I LOVE YOU AND BOY HAVE I MISSED YOU!!


NATURAL HEMP CORD COVERED BOTTLES


Ok, this is my Crafty Saturday project! pretty easy. I did not even take any pictures during the making of this because it is pretty self explanetory.

  • Find a bottle to your liking.
  • Get some hemp cord or jute cord.
  • Hot glue the cord around the bottle.
  • DONE!
  • Embellish it to your liking, I used my coffee filter flowers I have used in previous projects(just because I think they look great) I did cover the buttons with a little of the coffee filter, but let your imagination run!
  • And there you have it! A great vase!

Relaxing a Bit and Working on a Few projects!

Yes I did do crafts this week but also took time out to spend with a couple of my good friends.
Since I had no pictures of my projects in the making I thought the above picture would work. Had a great time with these two. Never a dull moment around these two sisters. Now onto my projects in the making-

Got started on a coffee table made out of a pallet.

  •  Pallet cut in half so will get two coffee tables out of it.
  • Sanded one of the tables.
  • Stained one of the tables.
  • Put poly on table.
  • Cut a piece of ply board to be attached to underside of pallet.
  • Sanded the ply board.

Also started work on another drawer footstool like the one I made for Angie a while back.
Hopefully will finish it this next week.

And then I also cut more wine bottles to be turned into wind chimes at a later date.
Will post pictures of all our wind chimes when I finish this new batch. They are great fun to make.


CRAFTY SATURDAY GET TOGETHER!!! SUCCESS!!!


The first official Crafty Saturday get together can now be put into the archives but not before we show you what we made together... Angie, Linda, and Rose. We had a great day. It was great being able to spend the weekend with Angie, drinking a few beers and a few glasses of wine while making some pretty cool crafts.  We used wine bottles, tin cans, and Angie and Rose helped me finish my blue jean weath.


 My weath.
I used an old pair of jeans and cut strips and wrapped the weath.
Ok now enter Angie and Rose, they put the finishing touches on my weath...the flowers and bow!
I absolutely love it!


Here are the wind chimes we made. I had already had the bottles cut, we modpodged tissue paper to the outside of the bottle and then for the clappers we used bottle pieces that did not make the cut (it is a great way to use otherwise throw away pieces of glass) and the wine glasses you see behind the chimes are the glasses we drank wine out of, this was kind of our parting gift. They turned out beautifully. Just put a votive in it and you have a nice candle holder.


TIN CAN turned useful again.
Some of the cans we made up...Angie really went to town...she loved both ways I made up the cans. Paint and burlap or lace, and buttons...and paint and graphics mod podged on them...the possibilities are endless!


Ok, the first project Rose did was to cover the inside of this box with orange felt for her son Alex who is also Angies boyfriend. You see when you put your iphone inside the box it magnifies the sound. It turned out really cool and really does magnify the sound.  Project accomplished!


So in ending this blog post here is one more pic of us totally enjoying ourselves and the company we are with.
OH CRAFTY SATURDAY HOW I LOVE THEE!!!


First official Crafty Saturday get together coming up Weekend of the 5th


Yes Rose, 
this is your wine bottle. I am bringing it so you can finish it. Holes are already drilled. 


Just a few things I am bringing for our Crafty Saturday Get to gether. Should be a great time spent with family and friends.

Wine Bottle Vase


Just a little something I decided to do while watching March madness. I love college hoops!
I have all these wine bottles and decided to pick out some pretty scrap book paper and modpodge it to the bottle for a nice vase.
Nothing to hard just cut my scrap book paper and used my mod podge  to glue it to the bottle and then used some string I had to give it a little depth and added zing.
And there it is. Pretty simple and quick.


Lace Trimmed Vanity Containers


My project this week is super simple and fast to complete. 
I love reusing cans and here is another project using cans.


1. Paint your cans any color you desire. I chose tan because I knew I was going to use black lace and I thought the two colors looked elegant together.
2.I used my trusty modpodge again and coated the cans. I used the gloss finish.
3.Cut lace to fit around can and hot glue in place. I also added the flowers on the front to give them a more glamorous look.
I think these would look really nice on a young girls vanity with make up brushes.


.....And there you have it. Oh Craft Saturday how I love thee!