Wedding sign

This summer I was asked to make a sign welcoming people to a wedding reception. 
I was touched that she wanted me to make it. 
I love how it turned out.


I had a piece of plywood 2 1/2' wide by I think 3 1/2' long., maybe longer.
(I better figure it out because I am making one for my daughter and her fiance!) I am truly excited for that one. 

So to begin with I came up with the design on my silouette cameo.


Ok next I cut it out and put the design on my board that I sanded and stained. I had to use a tape measure to make sure and get everything centered.. I think it came out pretty good.
Then the fun part came as I painted in the stencil. First I used modpodge to paint over the stencil to kind of seal the edges. After it dried for an hour i used the color of my choice which was white and painted over the stencil again. 

Then after it was dried really well I was able to take off the stencil and below is the result.


I love how it turned out and so did the bride and groom. They sat it outside before you walked into the reception to welcome people. The bride had her florist add some floral details to it.
Can't wait to make something a little like this for my daughter!

Front side of this grand old Dame Finished

        Well I have been waiting to post pictures of the front side of the house. She looks awesome. I am just so excited, and happy beyond words. 
         It has been a long journey but she is finally back to her former glory. Thanks to Harold Melby and his helpers, Bill Kirk (my awesome husband) and Jim and Shirley Kirk (my in-laws)


        The front had a lot of challenges with all the detail but she came out wonderful. We are just coming into fall and winter so won't be able to truly enjoy her until spring. 
         I think we will notice a difference in the warmth we have this winter because she is buttoned up pretty tight. You probably don't notice but the foundation was scimmed with a product called sure wall, which I think is kind of like a cement. You see it still has the original clay bricks for the foundation and a few were crumbling. So getting the foundation sealed up will help. Oh and now the entire house has all new replacemant windows. Bill and I had replaced the ones upstairs quite a few years ago and then on the main floor several uears ago.The only windows we had left were the kitchen windows and the office windows. They are now done also.
          I absolutely love coming down the hill and past our barn and then bam I see this big beautiful house. I am truly in love with it.
         We have a few plans for the front yard but that will have to wait for spring.

South and West Side of House finished!

It's getting closer! 

The south side and the west side of the house are now finished.


This huge project is coming to a close.
 The South side and west side(back of the house) is finished.
What I found so neat was the under layment siding they put on before the wood siding. Not sure why they put it on diagonally, but I am sure there was a good reason. We thought maybe for stability.


Can't wait to show the North side finished and then the beautiful front of the house with all its ornate finishes.

This has been an absolute joy to watch Harold and his helpers and my husband Bill transform the majestic old beauty.


Living Room Porch Redo

Ok,  2nd installment---Living Room Porch.

The living room porch really started to deteriorate due to the roof rotting. The guys braced up the roof, basically tore it off and replaced it. The posts were replaced and Harold even made the roof bend around like the original. They put all new flooring on the porch and the ceiling of the porch was redone with vinyl. 
They even put lattice around the bottom to keep out critters or an occasional dog (namely Bubba our sheepdog) from going under it. He has now found refuge in the house when it storms. Since he has gotten older he is not real fond of storms. Well I think he has earned a little house time.
As you can see by the pictures it has made a great improvement. So much so that we even sit on the porch again and enjoy what nature has to offer. We have several hummingbird feeders out and have really enjoyed sitting and watching those cute little birds. I think I am obsessed with them now.  
I am in love with the wrap around steps. Which were there in the beginning. I am going to try and find a picture from when she was young.

This is Bubba's mom Zoe under the porch. Apparently it was cool and shady under there plus I couldn't get to them to put flea and tick stuff on them. Smart dog, that Zoe! We miss her but we do still have Bubba!


Kitchen Porch redo

OK  so this isn't quite a craft post but I am so excited to share what is happening to our house. You see this house has been in my husbands family since they built it around 1908. I love this house, it sits out in the country and we are trying to get it back to the way it was when it was built. We have replaced all the windows in it over a span of several years. The last 4 are being put in this week. The windows downstairs are 72" long and the ones upstairs are 64" long.

We have lived here for 30 years. Before that my in-laws had renters in here which did the house no good except having people living in the house.

We have raised all four of our children here ( our oldest is now 30 the youngest just turned 24). It is great to have this big old gem for the kids to come back to. Bedrooms have changed a bit but there is plenty of room for everyone. Since we have been married we have always had Thanksgiving at our house. All our family always come to celebrate and we have always had plenty of room. Thanksgiving has always been my favorite holiday because it is about family and friends gathering and enjoying a great meal.

I grew up in town so when I came to live in the country it was kind of frightening. I can't imagine ever living in town again. I love being in the country. We have raised sheep, chickens, goats and even had rabbits. Now you can't do any of this living in town. I have always loved animals. Maybe that is why I have worked at our local vet clinic for the past 20 years.

Here is the kitchen porch redo. The porch hasn't always looked this bad but over the years and lack of funds have prevented us from doing what is right for this house. So glad my father-in-law is helping to put this wonderful old gem back to its true glory. He to spent a lot of time in this old house as a young boy.


As you can see she really needed some help. 
It is a work in progress but slowly we will bring her back.
I absolutely love the big sidwalk that was added.
Oh on a side note the kitty you see is one of our felines that likes to spend most of her time outside. She  loves to help Bill while he is  out working on the house.

It is so sad to me when I see big old houses deteriorating with no one to fix and love them again.
 This will never happen to this house ever again. She is just to beautiful!
Hope you enjoy! Please stop back soon I will posting our big porch redo next. 
So excited to show everyone.


Wedding gift

I am in the process of making a wedding gift for my sister to give as a gift.
It is going to be a wood sign using my silhouette cameo.

But before I show the final project I have to give a brief background of me getting my machine.

 I ordered my machine first week in January. I unfortunately was in a car accident a few days after I ordered it. I was in the hospital for 4 days and came home in a back brace ( I had fractured my 4 lumbar vertebrae) Need less to say I couldn't do much for several weeks. I got my machine while I was in the hospital, got home and could only look at it. It was very depressing to  see it there and not being able to do anything but look and think of all the things I was going to do with it.

Well after several weeks I finally took it out of the box and began to explore what this little machine can do. It is so much fun making designs on my computer.
Here are a few I have done.

Ok so here are the steps in which I make my signs.

First I decide what fonts I want to use and cut them out on my silhouette cameo.
I lay them out on my board and get the placement the way I want. I use painters tape to mark where each word is to be placed.

I had to do some layering on this sign so I did the heart first. I painted it and also set up my last name on the board. When I get the contact paper on the board and stuck down I do 2 thin layers of mod podge to seal the edges of the word or shape, whatever you are going to be stenciling. This helps to prevent bleed through. I then do 2 thin layers of paint for the stenciling.

After the heart was done and I peeled off the contact paper and I layered the names on top of the heart and went through the same process. In the picture below you can see the heart is complete and also the last name.


This picture you can see how I layered the names over the heart.


I then proceeded to mod podge and then stencil the names and other elements of my sign.
The real fun part is when you have done all the painting and impatiently waited for it to dry. I then get to peel off the contact paper and see how well I sealed the edges and painted the stencil.


And here is my finished sign!
I added a black frame around it and also drilled two holes in board to wire a jar on it for flowers.


Hope you enjoyed my little process. These signs are so fun to make. It is a new surprise with every new sign.
Please check us out on our etsy store for more of my signs.
www.craftysaturday.etsy.com

JAR ON WOOD

Just as the name implies, this craft is a mason jar painted and distressed then attached to a piece of pallet board.


The first thing I did ( or shall I say my husband Bill did) was get a pallet and take it apart, then cut 10" pieces.
I then sanded, stained, and sealed them with a waterbase sealant. 
Drill holes in the top with  my drill press.
I also drilled 2 holes about 5 inches from the bottom for the wire to go through.
For the jar I picked out a color of chalk paint  I wanted to use and painted the jar with 3 coats, letting the jar dry completely between coats

When the jar is dry take a piece of sand paper and distress it to your liking.

Okay the two pieces are ready to be married together.
You will need a piece of wire maybe about 12 inches long. Wrap the wire around the jar and criss cross wires at back and put through 2 holes drilled earlier.

This is the hardest part, take a pair of needle nose pliers and twist the two pieces of wire together until good and tight.


And there you have it!


You can either put some fake flowers in it or real flowers, it's up to you.


I had a lot of fun making these, as you can see I kind of went over board. I see gifts for a lot of people

OLD WINE BOTTLES...NEW USE


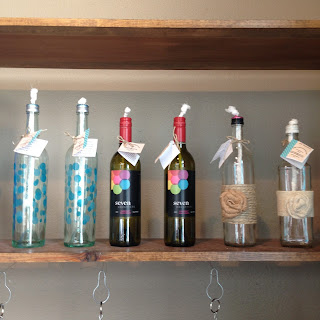
These citronella bottles were fun to make and super easy.
Pick some pretty bottles (and I have alot) embellish them if you like on the outside. 
The first 4 needed no embellishment, but the last two I used jute string and glued around 3 to 4 inches in the middle of the bottle.
 I purchased some cotton gauze from the Vet Clinic I work at and cut 3 pieces, then I braided them. I knotted both ends. You can also buy premade wick for citronella burners if you want.

I like using the screw lid bottles because then I don't have to buy any parts for the top of bottle to hold wick. I cut an 'X' in the top of the screw top and peeled back the 4 little triangles.


Then I take my wick I just made and push it through the top.


 All you have to do now is screw the lid on and you are finished.


The wicks I made do not go to the bottom of the bottle. They are a few inches from bottom so I can fill it with water up to just below wick and then I fill the rest up with citronella. 

Before you light your wick make sure to saturate the top of wick with citronella to make wick last longer.


Something else you can do to keep from using a whole wine bottle of citronella and give it a little more stability is put some of those little glass discs in the bottom. They seem to give the bottle more weight on the bottom.

Now you can sit back and admire your new burner while keeping those pesky mosquitoes away.


White Barns show Spring 2017

Well we had our show at the White Barns June 2-3. It was a success. We even camped out in my suburban one night. It was great when the show was done for the day we kicked back and enjoyed the evening with a couple drinks to relax and visit about the day.


I think our display was very nice and people friendly. Not to mention the barn was beautiful. It was a little warm at times. 
Angie had her stamping stuff set up so she could stamp bracelets right there. People would order them and tell her what they wanted on them and she would proceed to stamp away. Some stayed to watch her create their bracelet others left for 30 minutes or so and come back to a finished bracelet. It was something we had not done before and I think it worked out quite nicely.

I had been working on wood pallet signs and and so this was our setup for them. I also made what we called "Jar on wood" They were a nice hit. They are the jars you see hanging there with flowers in them. One woman bought one and said she was going to put it in her bathroom to put toothbrushes in.
The box in the center of the pic is Angies' stamping box filled with all her stamping stuff. We had several people ask us if it was for sale. It was a perfect eye catcher, I guess you could say intriguing to some. And while she was stamping we had people come up and watch her.

Another day of Crafting

Getting ready for our next show in June. I am working on more signs and Angie is working on more jewelry. Look how limber I still am! Well I think so anyway.
                                                               
Our next show


Check out our Crafty Saturday shirts!

Angie has been working on stamped bracelets and key chains. They are sure a lot of fun and the possibilities are endless,
The best thing about these shows is that Angie and I get to spend some time together.  When we aren't doing a show we are constantly face timing each other to see what each is working on.


Funky Junk #3!!

     Well we went back to the funky junk-a-loo for the third year. Had a great time.  Saw old friends and made new ones.
     The really great thing about craft fairs are the relationships that are made and the stories we hear.
One lady bought one of Angies' necklaces and was so emotional, you see her daughter is fighting breast cancer and she saw the necklace and said it was perfect for her. Another lady bought a necklace I made out of an old bobbin which had some charms on it. She also had a daughter-in-law fighting breast cancer and the charms on this necklace were perfect. So you see it is not just about making things and selling them, we get to enrich and help people on the way. And that is so rewarding.    
     That being said here are a few pics of our set up. Our setup over these past few years have really evolved. Just look back at our first show Funky-Junk-a-loo and you will see how far we have come. We just keep expanding and I think, getting better.
     We still make jewelry, Angie makes a lot of baby blankets, bibs, burp clothes and baby booties. I make few bibs burp clothes and booties.
     Now remember we live on opposite sides of the state so we face time a lot and decide on different things to try. Angie loves making jewelry and baby things and I love working with wood. Its perfect.


Still making jewelry


Cute little coffee mug holder. Angie has one hanging in her kitchen

magnets and painted cans are still on our list

love these jar sconces!


We purchased a silhouette cameo in January. Unfortunately the day before it came in the mail I was in an auto accident and all I could do when I got out of the hospital was look at it.
But once I was on the mend I started exploring and with several mistakes was finally on my way to making wood signs. I love and have always loved sayings. So this was a perfect outlet for me.
       I use mostly pallet boards with the exception of some plywood. We live on a farm and my husband was in the construction business so we have boards galore around the farm. And yes when we are out and about I am always on the lookout for pallets. Bill is a big help in that he cuts the pallets up for me. And puts up with the dining table and such being a little messy at times.


  please check out our page. https://www.facebook.com/craftysaturdayllc/
                                   
          And our shop on etsy.    www.craftysaturday.etsy.com